React Native in Production: Architecture Decisions That Survive Real-World Scale
React Native works in production at scale, but the decisions you make in the first three months determine whether the app is maintainable at month eighteen. These are the architectural choices that matter.
React Native gets a polarized reception in the engineering community. Teams that have had good experiences with it credit the architecture decisions they made early. Teams that have had bad experiences almost always trace the pain back to choices made when their first customer signed up, or when they retrofitted features without considering mobile constraints.
This post covers the React Native architecture decisions that matter for a production mobile app, the kind of app used by real users, maintained by a team, and expected to work reliably across iOS and Android for more than a year.
Project structure for maintainability
React Native projects that start as flat directories become unmaintainable at scale. The structure we use for production apps:
src/

  app/              # Navigation configuration (Expo Router or React Navigation)

  components/

    ui/             # Truly generic, stateless, no business logic

    shared/         # Shared across features, may have limited state

  features/

    auth/           # Feature-scoped: components, screens, hooks, API calls

    patient/

    appointments/

    medication/

  hooks/            # App-wide hooks (useAuth, usePermissions, useNetworkStatus)

  services/         # API clients, external service wrappers

  store/            # Global state (Zustand or Redux Toolkit)

  utils/            # Pure functions, no React

  types/            # Shared TypeScript types
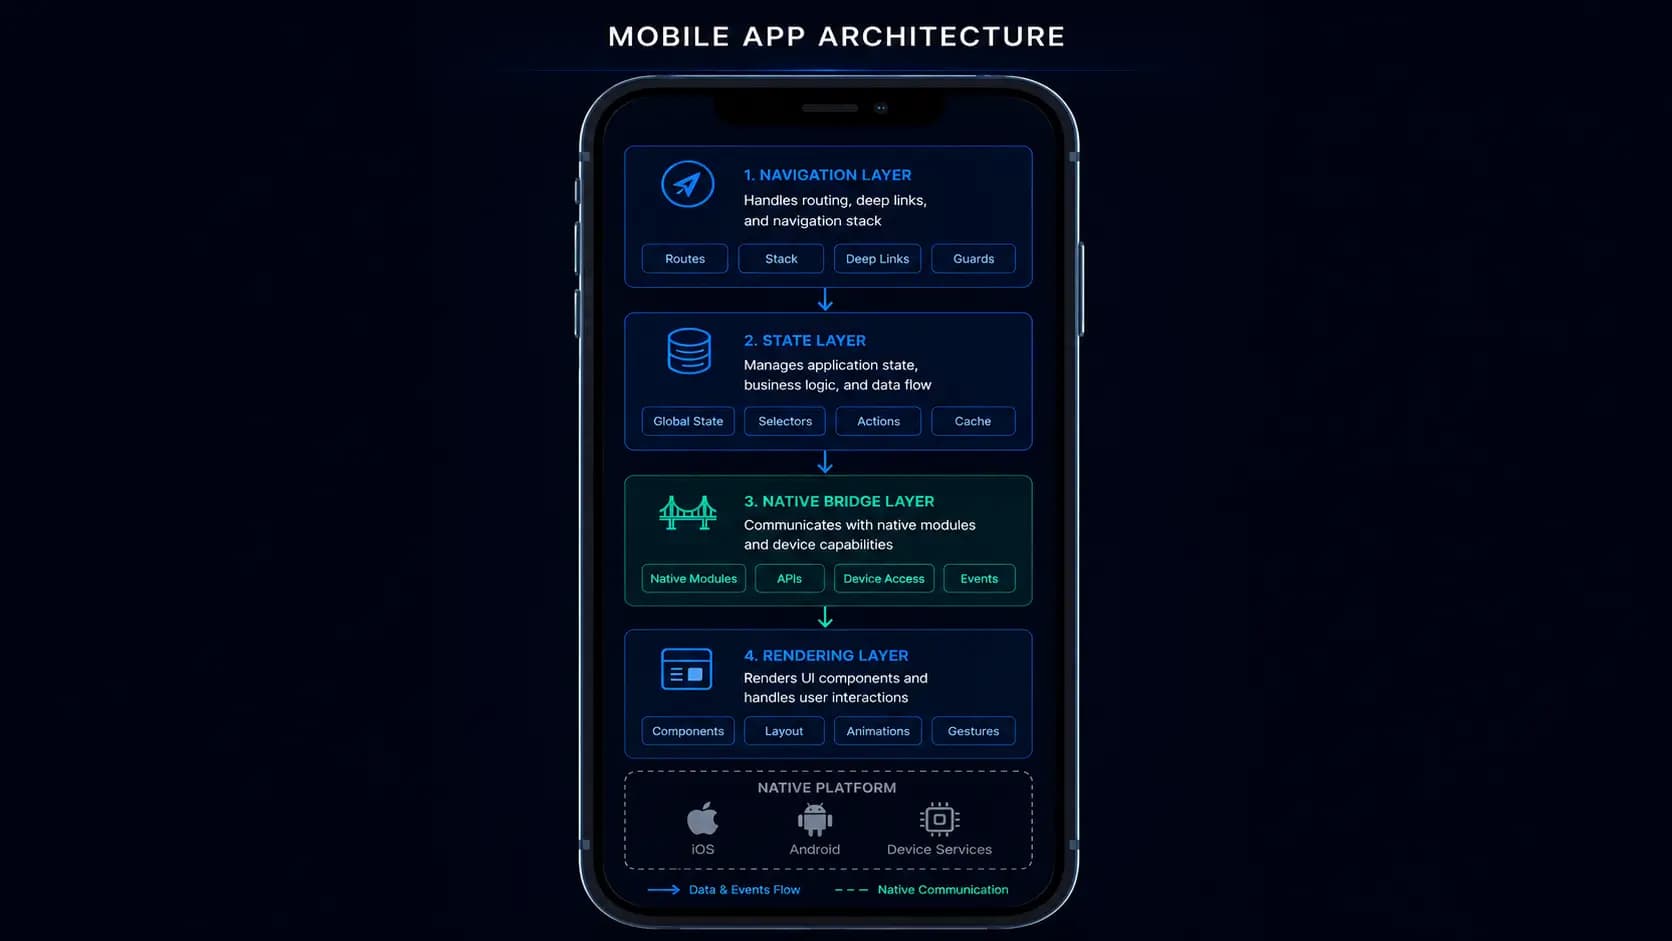
Feature-scoped directories are the key decision. Each feature owns its own components, hooks, API calls, and local state. This avoids the situation where a component directory becomes a dumping ground for everything and dependencies between components become impossible to understand.
Navigation: Expo Router vs React Navigation
For new projects, Expo Router is our current default. The file-system based routing model eliminates a class of navigation configuration bugs and makes deep linking significantly simpler to implement correctly. The app/ directory structure mirrors the URL structure of the app, which makes navigation logic easier to reason about.
React Navigation is still the right choice when:
- You need navigation patterns that Expo Router does not support cleanly, such as custom transition animations or complex nested tab and drawer combinations.
- The project is not an Expo project and you cannot or do not want to adopt Expo's toolchain.
- The team has deep React Navigation expertise and the project has complex navigation requirements that benefit from explicit configuration.
The worst situation is mixing both in the same project. Pick one and use it consistently.
State management
The state management decision in React Native is the same as in web React, with one additional consideration: mobile apps are more memory-constrained and state must serialize cleanly for persistence and background-foreground transitions.
Our current default for new projects is Zustand for most state, with React Query (TanStack Query) for server state. The combination works well because:
- Zustand's flat store structure makes it easy to reason about what is in global state versus local component state.
- React Query's cache management and background refetch behavior handles the mobile-specific challenge of data becoming stale when the app is backgrounded.
- The two libraries compose cleanly, allowing global UI state like auth, theme, and user preferences to live in Zustand, and server data in React Query.
// auth store: simple Zustand store

import { create } from 'zustand'

import { persist, createJSONStorage } from 'zustand/middleware'

import AsyncStorage from '@react-native-async-storage/async-storage'


interface AuthState {

  token: string | null

  userId: string | null

  setAuth: (token: string, userId: string) => void

  clearAuth: () => void

}


export const useAuthStore = create()(

  persist(

    (set) => ({

      token: null,

      userId: null,

      setAuth: (token, userId) => set({ token, userId }),

      clearAuth: () => set({ token: null, userId: null }),

    }),

    {

      name: 'auth-storage',

      storage: createJSONStorage(() => AsyncStorage),

    }

  )

)
Native modules and the new architecture
React Native's new architecture involving JSI, Fabric, and TurboModules is now stable and is the default in new React Native projects. The old bridge-based architecture is still used in existing apps but is being deprecated. Understanding the architecture matters for performance decisions.
When to use native modules
The general rule: use JavaScript implementations from the React Native ecosystem when they exist and perform adequately. Drop to native modules when:
- The feature requires access to platform APIs not exposed through JavaScript, such as background location, camera with custom processing, Bluetooth, NFC, or biometric authentication.
- Performance is critical and JavaScript processing cannot keep up, such as real-time audio or video processing and complex animations.
- You need to integrate with a native SDK that has no React Native wrapper.
Writing custom native modules has a real cost: it requires iOS (Swift or Objective-C) and Android (Kotlin or Java) implementations, doubles the surface area for bugs, requires platform-specific testing, and adds friction to future React Native version upgrades. Use community-maintained native modules rather than writing your own whenever possible.
Performance patterns that matter in practice
FlatList configuration
The most common performance bottleneck in React Native apps is a FlatList rendering too many items with too much per-item work. The critical configuration:
const renderItem = useCallback(({ item }: { item: PatientRecord }) => (
({ // only if items have fixed height, eliminates layout measurement
length: ITEM_HEIGHT,
offset: ITEM_HEIGHT * index,
index,
})}
/> The getItemLayout optimization is the most impactful for fixed-height lists because it eliminates the measurement pass that React Native needs to calculate scroll positions. Without it, scrolling to a specific item index requires measuring every item between the current position and the target, which is expensive on long lists.
Re-render prevention
React Native renders on the JavaScript thread and sends layout updates to the native thread. Unnecessary re-renders are more expensive than in web React because they cross the bridge, or the JSI layer in the new architecture. Apply React.memo to list item components and use useCallback or useMemo for any values passed as props to memoized components.
// Memoize list items: they should only re-render when their specific data changes

const PatientListItem = React.memo(({ patient }: { patient: PatientRecord }) => {

  return (

     router.push(`/patient/\${patient.id}`)}>

      {patient.name}

      {patient.status}


  )

}, (prevProps, nextProps) => prevProps.patient.id === nextProps.patient.id &&

                              prevProps.patient.status === nextProps.patient.status)
Offline support architecture
Mobile apps face a challenge web apps do not: users expect the app to work with degraded or no connectivity. Implementing offline support is significantly more complex than just caching things in AsyncStorage.
The pattern that works for healthcare and field-use applications:
- Read operations always succeed, meaning data is served from the React Query cache or a local SQLite database if the network is unavailable.
- Write operations are queued when offline, where a mutation queue stores pending writes and replays them when connectivity is restored.
- Conflict resolution is defined per entity; for most healthcare data, last-write-wins is not acceptable, meaning you must define explicit conflict resolution rules.
- Sync status is visible to the user, since a clear indicator showing items pending sync prevents users from thinking their work is saved when it is not.
// Mutation queue for offline writes

class MutationQueue {

  async enqueue(mutation: PendingMutation): Promise {

    await db.mutationQueue.create({ data: { ...mutation, enqueuedAt: new Date() } })

    if (await this.isOnline()) {

      await this.flush()

    }

  }


  async flush(): Promise {

    const pending = await db.mutationQueue.findMany({

      where: { status: 'pending' },

      orderBy: { enqueuedAt: 'asc' },

    })


    for (const mutation of pending) {

      try {

        await applyMutation(mutation)

        await db.mutationQueue.update({ where: { id: mutation.id }, data: { status: 'completed' } })

      } catch (error) {

        await db.mutationQueue.update({

          where: { id: mutation.id },

          data: { status: 'failed', error: String(error), failedAt: new Date() }

        })

      }

    }

  }

}
Push notifications
Push notifications in React Native require platform-specific setup involving APNs for iOS and FCM for Android, plus a server-side notification service. Expo Notifications simplifies this significantly for Expo projects. For non-Expo projects, react-native-firebase is the standard.
The integration pattern we use: notification tokens are stored server-side and associated with the user account. When a notification needs to be sent, the server sends it through the notification service to all active devices for that user. This handles the common case of a user with multiple devices and eliminates the need for clients to manage their own notification subscriptions.
Testing strategy
React Native testing is genuinely harder than web React testing because of the native rendering layer. The practical testing strategy:
- Unit tests (Jest): Pure JavaScript testing for utilities, business logic, data transformations, and custom hooks with mock dependencies.
- Component tests (React Native Testing Library): Component render and interaction tests with the native rendering layer mocked.
- E2E tests (Detox or Maestro): Critical flows only, such as login, the core workflow, or a critical payment action. E2E tests for React Native are significantly slower and more flaky than for web, so keep the E2E suite small and focused.
The investment that pays off disproportionately is testing custom hooks thoroughly. Hooks encapsulate a large fraction of the logic in a React Native app, and a well-tested hook suite gives much higher confidence per test than component-level tests that mix rendering concerns with business logic.
If you are planning a React Native app for a healthcare, e-commerce, or enterprise mobile use case and want to avoid the architectural decisions that cause pain six months in, we have built several of these apps and can help you get the foundation right from the start.
Written by

Founder & CEO
Gaurang Ghinaiya is the Founder & CEO of Nexios Technologies. He is passionate about building innovative software solutions that drive business growth. With years of experience in technology leadership, he guides teams toward excellence.